Repairing the climate control backlight
- krowles7

- Feb 9, 2021
- 5 min read
Updated: Sep 16, 2021
Removing the unit from the vehicle and carrying out the repair isn't as difficult as it might appear.
This instruction is for the AUTOMATIC versions. I'm not sure about the gear change assembly on MANUAL versions but I expect it will actually be easier as you will probably only need to release the gear lever boot and slide the console over the lever. Don't quote me on that… Ive not had a manual Vel Satis but I'm assuming there will be no physical connection between the gear lever and the centre console other than the boot. Automatic's are slightly different.
Before you start, insert the Renault card into the card reader, press the foot break and shift the gear change lever to Drive. Remove the Renault Card.
Next, remove the side trim from the centre console. To do this you will need to open the centre console storage compartment and wedge it open. I blocked one of the hinges with a piece of cardboard. Now you will need to use a little force! Take hold of the trim at the front and the rear… get your fingers under the front if you can and pull backwards and upwards at about 30 degrees. It can be a little stubborn (It's French) but show it who's boss and give it a good tug. (backwards and upwards). The pegs that hold it in place are made from touch nylon and are pretty strong and will bend without damage if you struggle a bit. Now repeat the action on the other side.
Open the small storage compartment on the dash immediately above the Climate control unit and remove the inner tray. Usually you can do this with just your hands but occasionally they can behave a bit French and need persuading a little. If that’s the case, prise a flat blade screwdriver under the bottom lip of tray and gently lever the screwdriver downwards a little and the tray with pop out of its retainer clip. Remove the tray but leave the door in the open position.
Now that the side trim and the storage tray have been removed, place your fingers under the center console at the ash tray end and lift upwards, you might need a little force here too but not nearly as much as you may have needed with the side trim. Release the retaining clips to the point where you can get a second hand underneath while holding the console up with the other hand. Release the four electrical block connectors from their respective sockets. Bear in mind that these connectors have locking clips and won't just pull straight off. You'll need to squeeze or lift the clip to release them…. and NEVER pull the wires, JUST the block. Don't worry about labeling them or arranging them in particular order to assist reassembly because they are ALL different and can only be plugged into the correct socket.
Take hold of the centre console with a hand on either side and work from the rear to the front and ease loose the retaining clips up to the gear lever point. Now you will need to remove the silver trim that circles the lever itself. I found that the best way to do this was by using two hands. With one hand take a grip of the silver trim on the top side and locate the clip(s) on the underside and gently ease them free using your thumb on the other hand. It will release actually quite easily and without damage or drama if you do it this way. With the gear lever trim released, gently slide it up the shaft to the point where it cant go any further because of the sliding boot thingy (I'm sure it has a proper name but I don't know what it is, although I'm sure you know what I mean). Be careful not to force it higher up the shaft than it will comfortably travel or you may damage it. There is an electrical block connector that powers the LED's that needs to be removed. You'll find this at the front left hand side of the trim. With the electrical connector removed you should now be able to maneuver the trim in a circular motion around the gear lever. You're going to need to be able to do this as there are now four screws you need to remove.
At this point, allow the centre console to rest back in position and get an old towel or something similar to block the gap between the center console trim and the gear lever, you don’t want screws or screwdrivers falling down there, trust me on this… I KNOW!!! So, now you need to remove the four screws that retain the (sliding thingy) to the gear lever trim. There’s one in each corner and they are reasonable easy to access but you are going to need a T10 star driver for this. I was a bit annoyed about that at first but when it comes to putting them back you will be thankful they used T10 screws. You see, its a bit tricky relocating the screws on reassembly but when they are firmly secured on the end of a T10 star driver they don't fall off and its Childs play, so make sure you have a T10 before starting and the shorter the shaft the better.
With the four screws removed you can now slide the circular trim over the gear lever and allow the (sliding thingy… somebody give it a name please) to rest at the base of the gear lever. The centre console will now lift over it. Take care that the LED assembly doesn’t fall apart on the circular gear lever trim… mine did, but you simply just put it back in place. I don’t think its actually fixed by anything and its just held in place by the trim itself… a bit like the LCD in the climate control unit as you will see later. So now you can remove the centre console. easing your fingers along each side, release any remaining clips up to the climate control unit it's self. Now switch your attention to the upper most part of the trim just under the flap for the storage container you removed earlier. Get your fingers in here and gently pull to release the final clips. Before you can remove the centre console trim you need to get a hand in and detach the card reader. Don’t remove any wiring just detach the card reader from the trim… there's two plastic clips, one either side and it snaps back into place when reassembling very easily indeed. Now finally ease the trim over the climate control unit and away from the centre console.
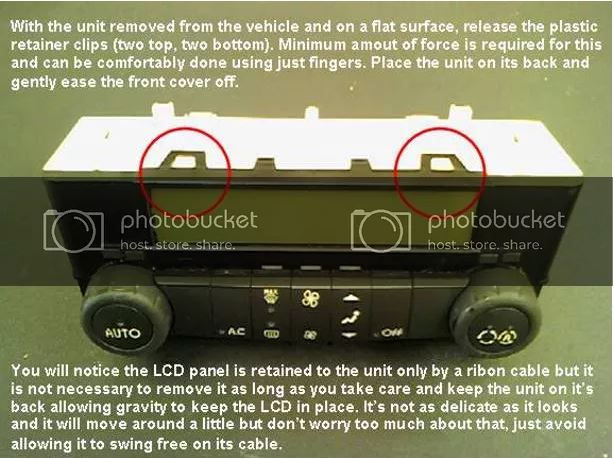
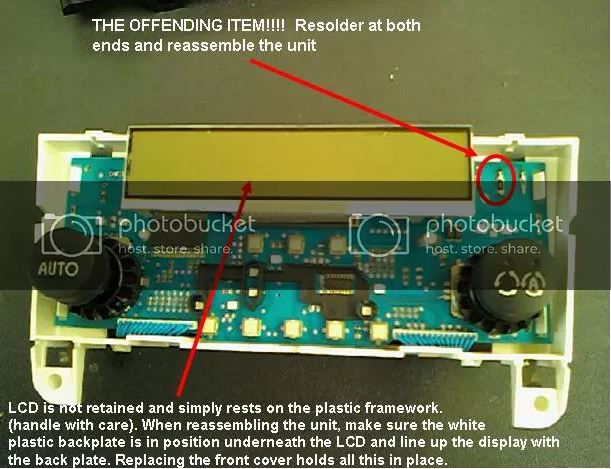
Now you are ready to remove the unit from the vehicle and carry out the repair. I've explained this in pictures.

Recent Posts
See AllAll Information is taken from the old website Vel-satis.org and is purely for the purpose of sharing and saving knowledge that would be...

*Some information taken from Vel-satis.org The aerial/GPS junction plate is on the rear offside pillar accessed by taking the plastic...
Really useful post this! Just remember that the climate backlight should always be on the minute the keycard is slotted in!